Looking to sell SVG files on online marketplaces? Follow this detailed tutorial to learn how to make SVG files to sell on Etsy and other SVG marketplaces.

Creating and selling SVG designs is an excellent option to consider if you want to make money online.
Whether you are a teacher, student, stay-at-home mom, business owner, or anyone looking for a business idea that you can work on as a side hustle or a full-time job, creating digital products to sell is a lucrative option.
By identifying the right SVG files to sell and then making, selling, and promoting them, you can expect to make a passive or full-time income.
Download Now: Free How to Make SVG Files to Sell Ebook
This detailed guide will help you get started with your SVG business. I go through everything from how to create SVG files to marketing strategies that’ll attract customers to your products.
Why you should make and sell SVG files?
Download Now: 40 FREE Halloween SVGs
Download Now: Free 40+ Font Super Bundle
SVG files are popular for DIY crafts and are in demand on sites like Etsy and Creative Fabrica. Crafters are constantly seeking out unique SVG files for everything from t-shirts to signs.
In addition to the popularity of SVG files, they offer business owners a number of other advantages, including:
- Passive Income – Once the design is crafted, selling SVG files can become a recurring revenue stream. The initial effort to create the file pays off, as it can be sold multiple times without any extra work involved.
- Work from Anywhere – You can create and sell SVG files from anywhere, making it an ideal choice for those looking for a home-based business idea.
- Minimal Investment – The cost of entry into the SVG file market is relatively low, requiring primarily time and creativity, making it a financially accessible business venture for many.
“Sell SVGs Like Crazy” shows you how to design & sell SVGs online – even if you're a total beginner. Grab your copy and start earning today!
Download for free
Ready to learn how to make and sell SVG files? Let's dive right in!
- What is an SVG file?
- Best software to create SVG files
- Best fonts to make SVG files
- How to make SVG files in Adobe Illustrator?
- Where to sell SVG files?
- How to upload SVG files?
- Can you make money selling SVG files?
- How to promote your SVG files?
- How to license SVG files?
- Extra Tips about Selling SVG Files
- Final thoughts on How to make SVG files to sell
What is an SVG file?
Notice how it turns blurry after a certain point when you zoom into a picture?
This happens because image formats like JPEG or PNG are raster-based, which means they are composed of a fixed number of pixels that come together to form an image.
Based on the number of pixels per inch an image is made up of, which is also known as its resolution, its clarity varies.
Contrast this to an SVG file, a vector file format that helps scale graphics without losing quality.
This is because SVG, which is short for Scalable Vector Graphics, stores image information in code.
SVG files have many applications, but we will concentrate on creating them and ensuring that they work seamlessly with cutting machines.
When you import the SVG file to the cutting machine software like Cricut Design Space or Silhouette, the information in the SVG file is read and executed by your machine to cut the design.
Best software to create SVG files
After years of designing and selling SVG files and trying out different programs, Adobe Illustrator is the best software to make SVG files.
The following are the best paid and free software options when it comes to creating SVG files –
I have a subscription to Adobe Creative Cloud, and it is hands down the most important business investment I ever made. The ability to create files that work well with cutting machines is unbeatable in Adobe Illustrator.
If you are serious about building a thriving SVG business, starting with the right tools is the first step. You can sign up for the free 7-day Adobe Illustrator trial to start making SVG files.
If possible, use a laptop that can run Illustrator without getting stuck every other minute. The minimum configuration I recommend is at least 8GB RAM and an i5 processor. I started with an old and cranky laptop, and it wasted so much time that I could have spent on designing.
Once your business starts growing, consider investing in an ergonomic chair to support the long hours and a good quality display monitor to see your designs on a bigger screen.
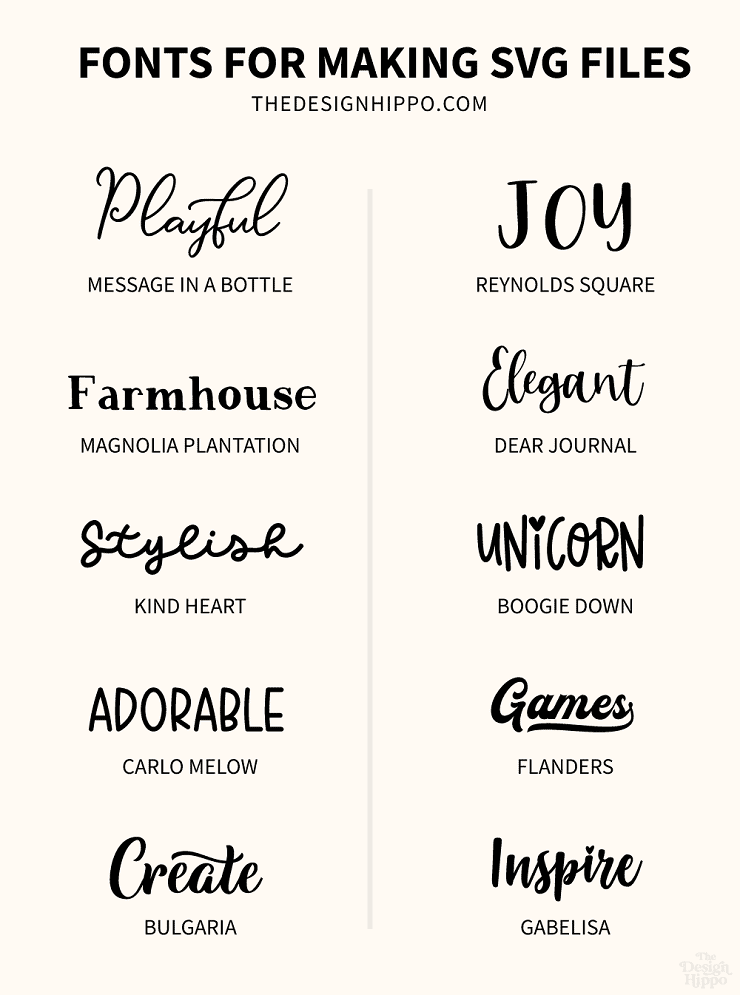
Best fonts to make SVG files
There are specific requirements a font needs to meet for it to be suitable for making SVG files.
Choosing the best fonts is important in making and selling SVG files. They don't just determine your design style but also determine the quality of the cut your customer will achieve.
Choosing a font that is not smooth, has unnecessary twists and turns, or is too complicated or too thin to cut can result in a bad experience for a customer and a negative review of your product.
When you look at some fonts, you know straight away that they are not right for cutting. Like the one below –
The font above is beautiful but not suitable for cutting. It is not smooth and will be hard for the machine to cut.
Also, a font may look smooth on the surface but still have issues. The best way to determine this is by installing the font and testing it out in Illustrator.
Pick a font that has a smooth path and the least number of “anchor points.” You can do this by installing the font and writing text using it in Adobe Illustrator. When you create outlines for the text, you will see the points and paths that make up the words.
Since it is impossible to purchase every font and test if it works for cutting, I put together a list of fonts that I have already tested and used to make SVG files.
Best Cricut Fonts: Tested In Our Projects
My Favorite Fonts for Making SVG Files
When you are starting, it's necessary to play with different fonts to determine your design style. You will also need design resources to create branding for your online store and social media like Facebook and Pinterest.
You can purchase these resources as needed, or an excellent option to consider is the Creative Fabrica subscription. All the fonts I use for creating SVG files (including the ones in the image above) are from Creative Fabrica.
With the monthly subscription, you can access millions of fonts, graphics, and mock-ups. Click my exclusive link now and get your first month of unlimited access for only $1.
How to make SVG files in Adobe Illustrator?
- Create a new document
- Type your text and choose the font you like
- Convert the text to outlines and weld them together
- Align your design to the artboard and save
- Export the SVG file from Illustrator
Open Adobe Illustrator if you already have the application. If you don't already have the application, start a free trial by signing up here.
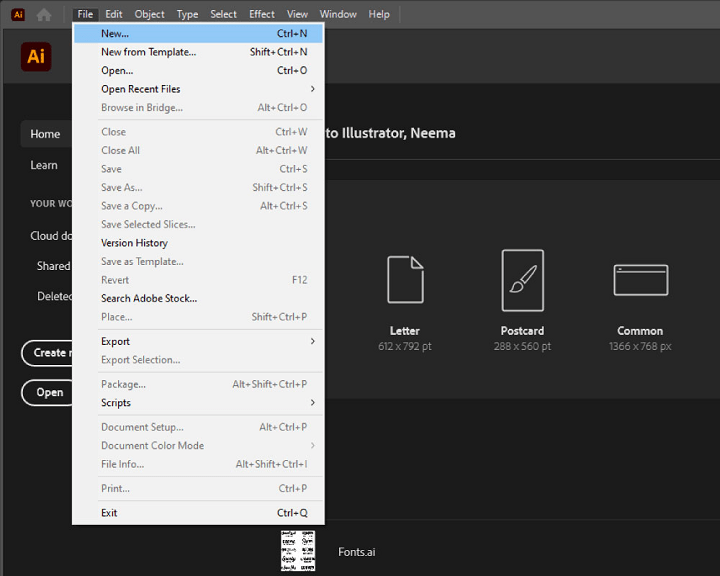
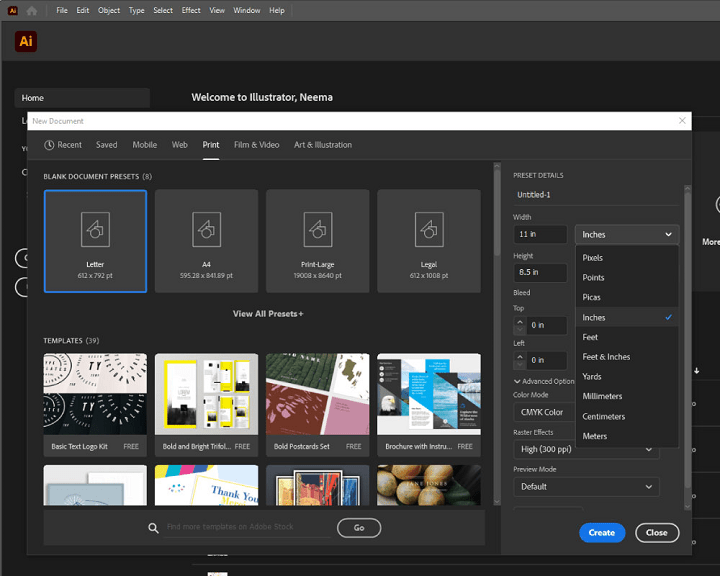
1. Create a new document
Go to File > New…
You will see a window pop-up called New Document, where you can define the artboard size.
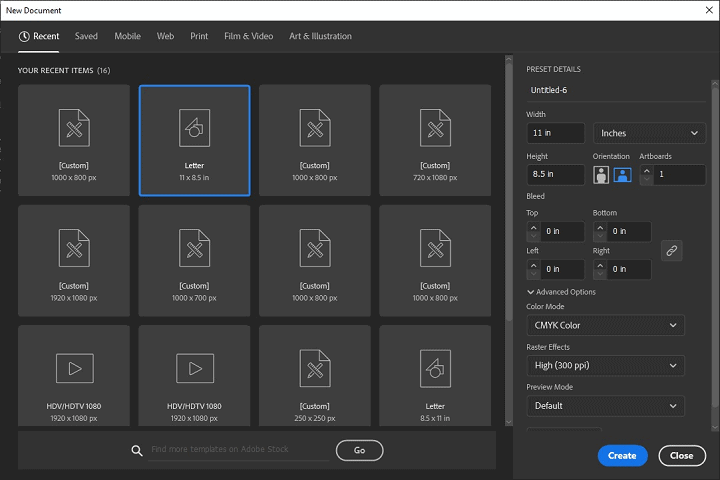
When finally exported, the artboard size you input here will determine the SVG file size.
For example, if I am making a t-shirt design, I can choose a design width of around 11 inches and a height of around 8.5 inches. The design will retain the same dimensions when we export the SVG file and import it to Cricut.
In the window, under the section Preset Details, name your document, then go to Width and choose Inches in the dropdown.
These are the artboard settings I am using for this tutorial –
- Input Width 11 in and Height 8.5 in
- Select Orientation Landscape
- Color Mode > CMYK Color
- Raster Effects > High(300 PPI)
Click on Create.
The blank artboard will appear on the screen.
2. Type your text and choose the font you like
Now click on the Type Tool(T).
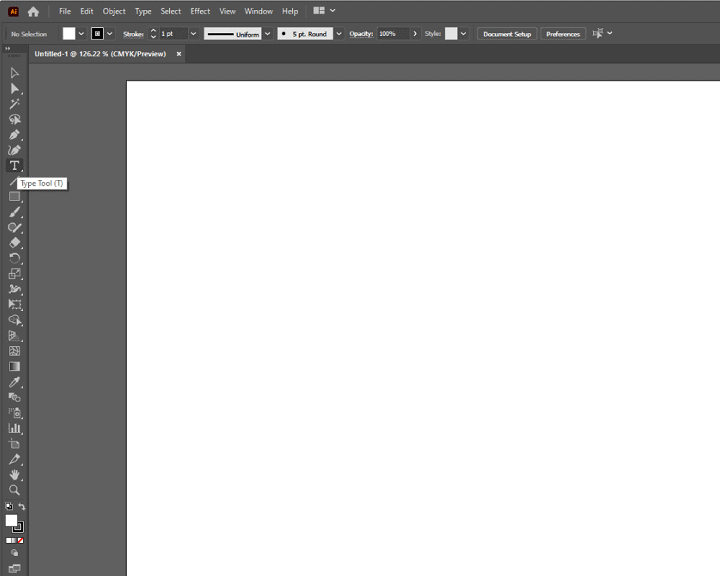
Then place and click it on the artboard. The sample text will appear in the default font.
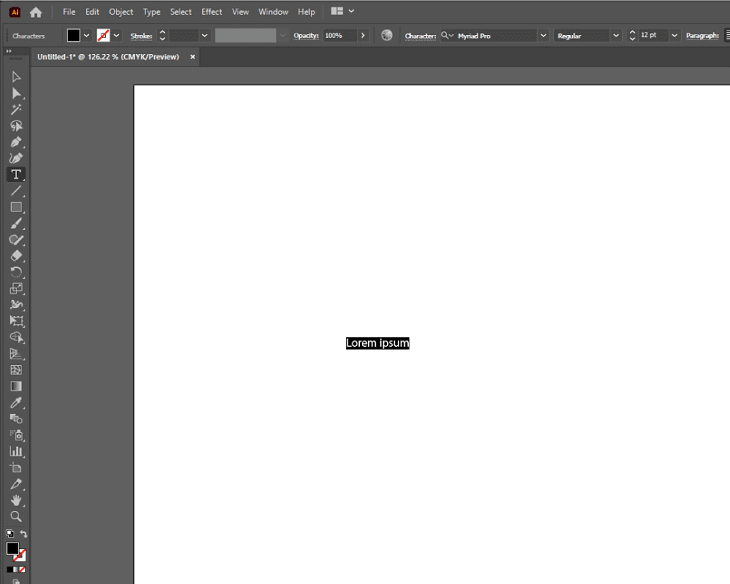
Change the default text with words of your choice to be used in the design.
Now select the font you would like to use for the design. For this, go to the toolbar and locate the Fonts dropdown beside the Character section.
I selected one of my favorite fonts that work well with cutting machines – Auttie Script.
Now it's time to resize the text. For this, click on the Selection Tool. This will select your text as an object.
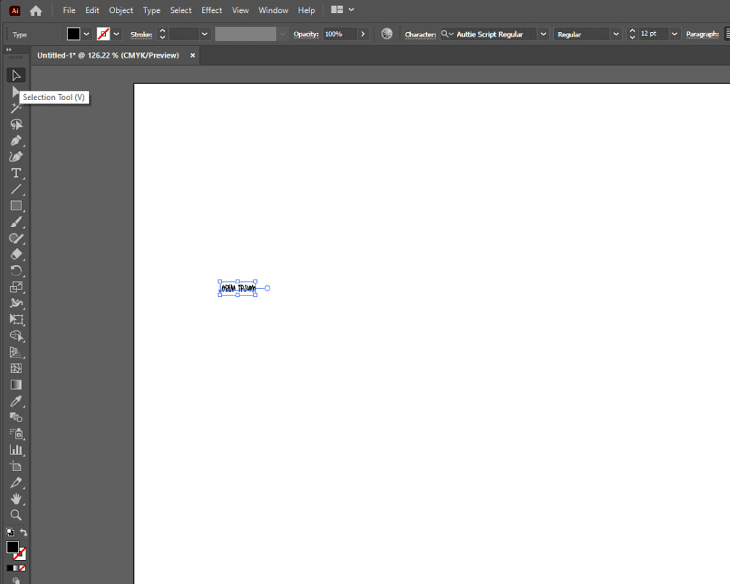
Hold Shift on your keyboard, place your cursor on the box that appears around the text, and expand it. You should be able to see the text in larger font size.
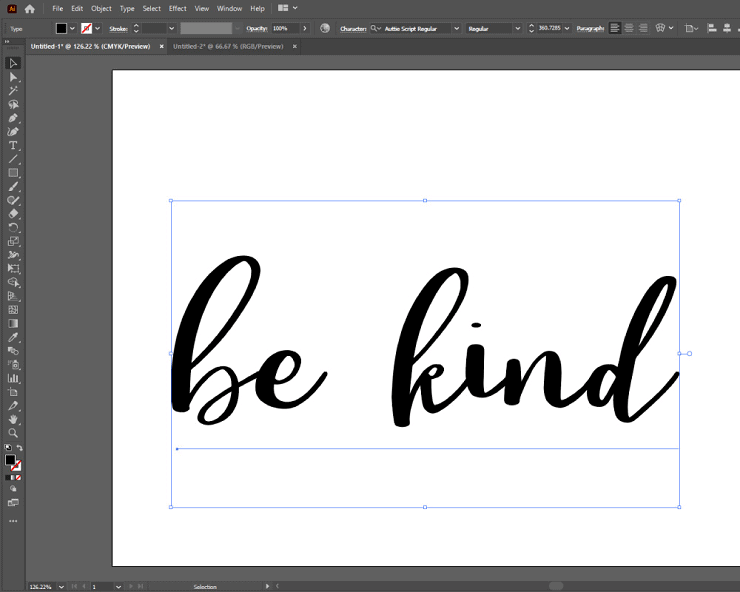
Alternatively, you can go to the Font Size dropdown beside the Fonts section to input the size directly.
3. Convert the text to outlines and weld them together
We will now convert the text to outlines. The outlines will help cutting machines get directional and coordinate information from the SVG file.
Right-click on the text box and select Create Outlines.
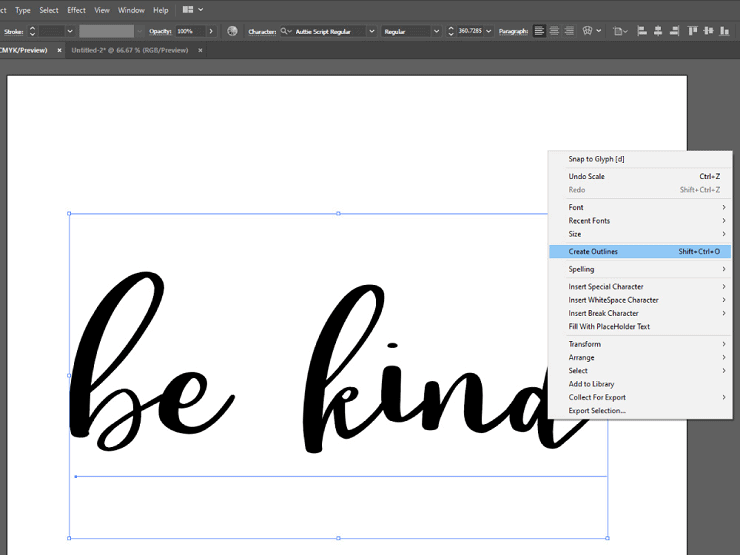
Now that your text has been converted to outlines, we have to weld all the letters together.
Each letter has an outline, but it overlaps with the next letter. This is because we used a script font with connecting letters.
We don't want the machine to cut the outline of the preceding letter on the next letter.
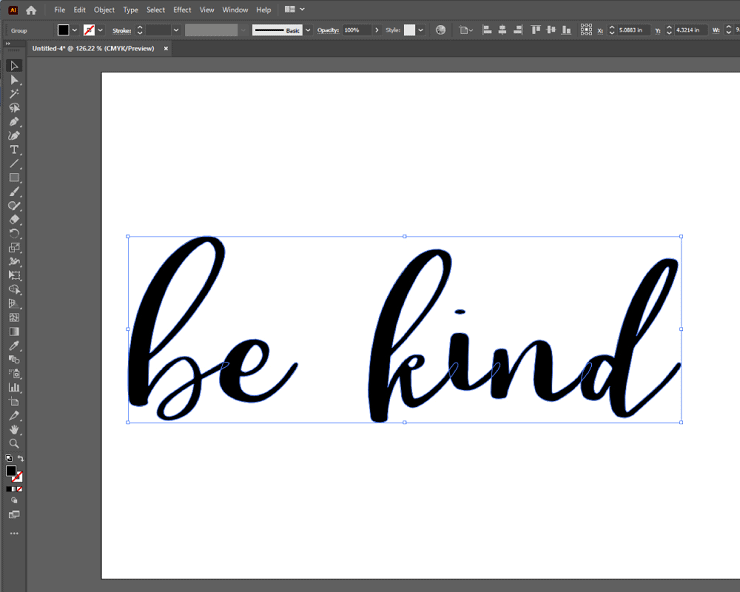
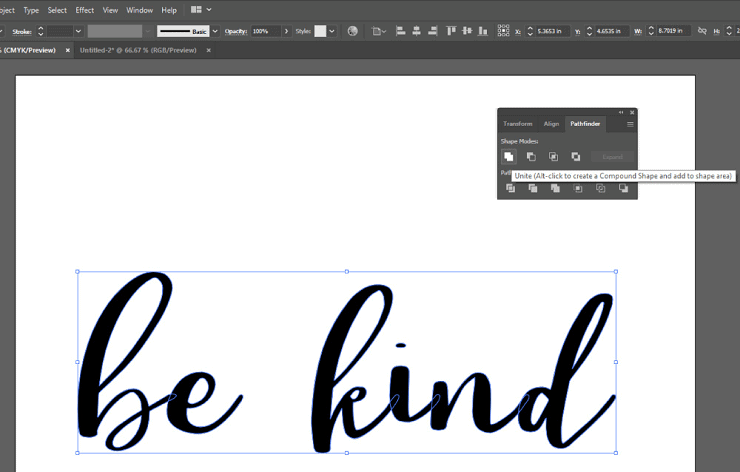
To weld the letters, we will use the Pathfinder tool. Click on Window in your toolbar. Go to Pathfinder.
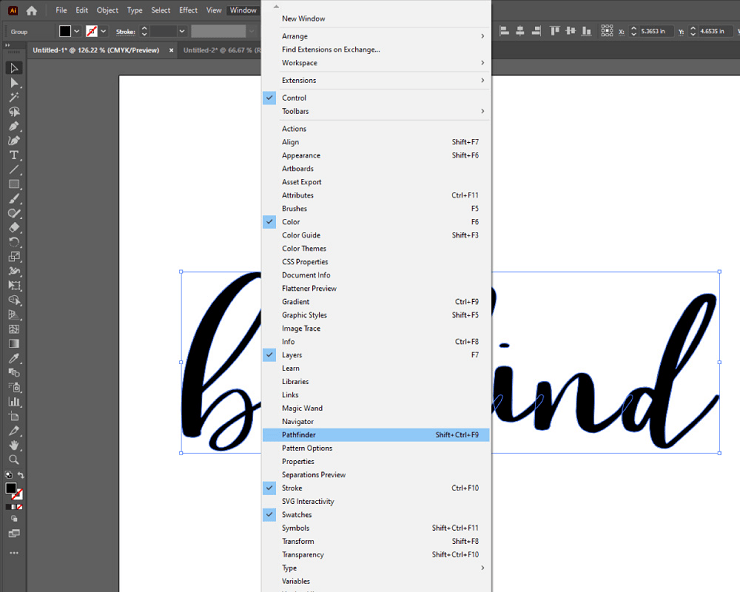
The Pathfinder window will pop up. While having your text selected, go to the Shape Modes section and select Unite.
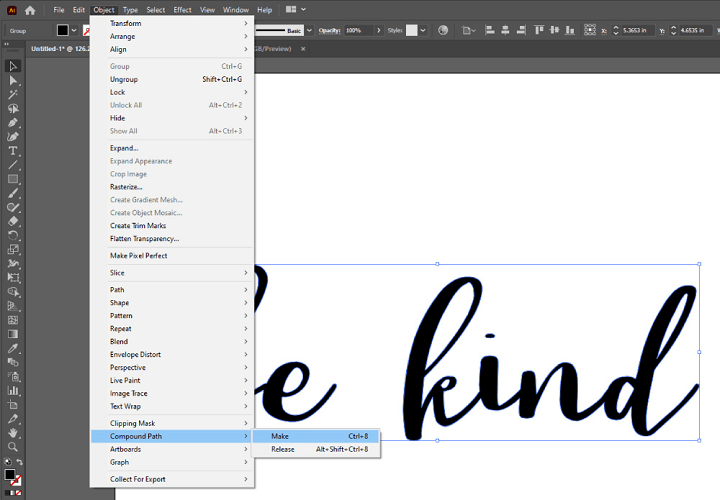
For this simple text design, we want the design to be on a single layer. This will ensure that the design shows up on a single mat in the Cricut Design Space.
Go to Object in the toolbar and select Compound Path > Make.
4. Align your design to the artboard and save
Align the design on your artboard by going to Window and selecting Align.
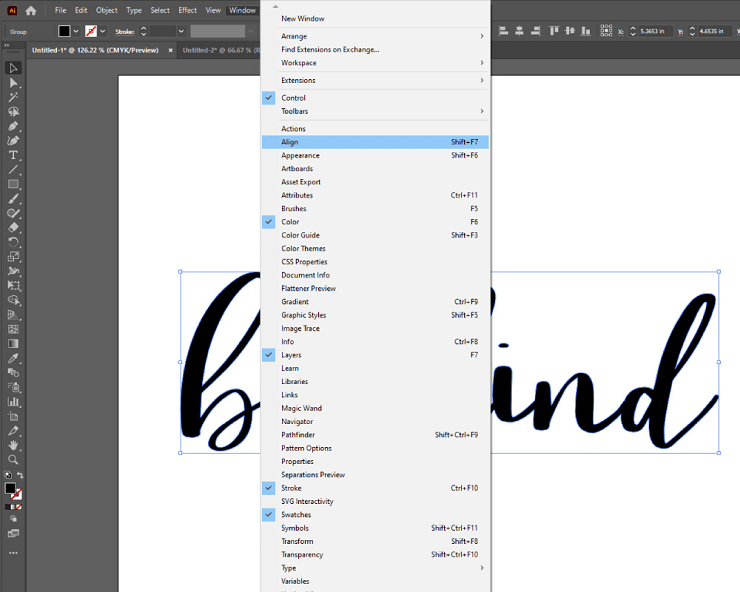

I like to center the design on my artboard vertically and horizontally.
Go to Align To in the Align pop-up window and select Align to Artboard.

Then go to Align Objects and center the design both horizontally and vertically.
You can choose to resize the design again to fit the artboard properly at this point.
Select your text and expand it by holding ALT + SHIFT and dragging on the box. Holding ALT and SHIFT ensures that the design stays centered on the artboard while being resized.
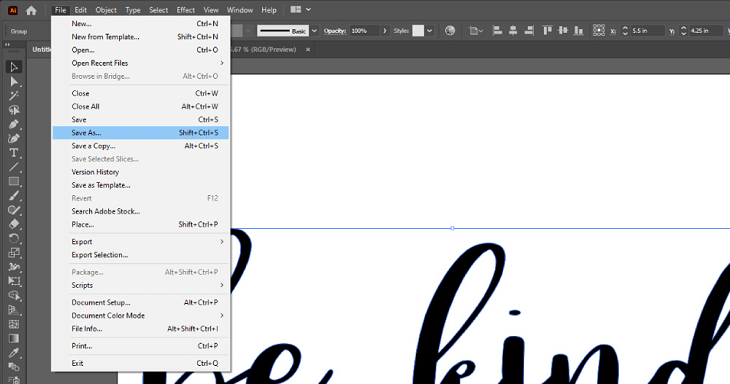
Save your design work by going to File > Save As… and storing it at your desired location.
How to export the SVG file from Illustrator?
Go to File > Export > Export As…
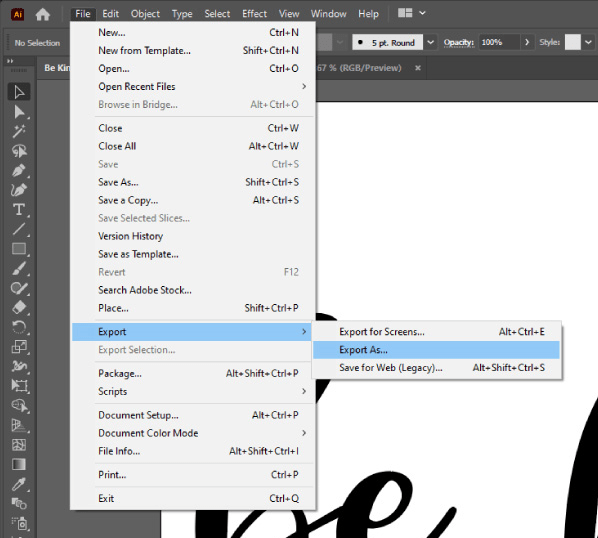
A window will pop up. In the Save as type: section, choose SVG (*.SVG).
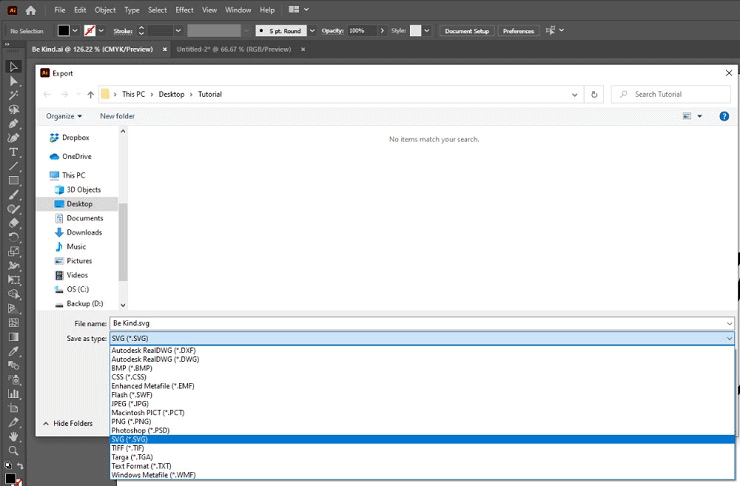
Click on Export. SVG Options window will pop up. Click on OK. Your destination folder should now have a file.
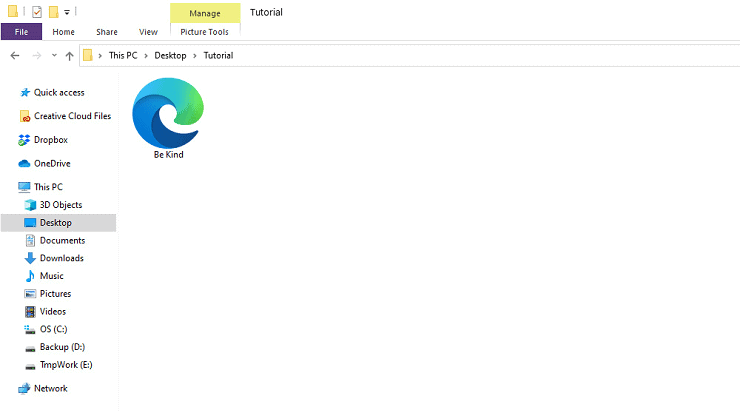
Please note that this SVG file may appear differently depending on your device settings. It may not appear as a . SVG file and will look mostly like a browser file – chrome or HTML document.
Though the appearance may vary, the file is still an SVG file.
How to make layered or multi-layer SVG files?
Following the steps so far, we were able to create a single-layer SVG file.
We will now create a two-layer SVG file from the same design by placing each word in a separate layer. This way, the customer will have the flexibility to cut the design in multiple colors of vinyl.
When you want to add more elements to a design, like hearts, wreaths, etc., it's best to provide them in separate layers. Each Compound Path on your artboard in Adobe Illustrator translates to being a separate layer in Cricut Design Space.
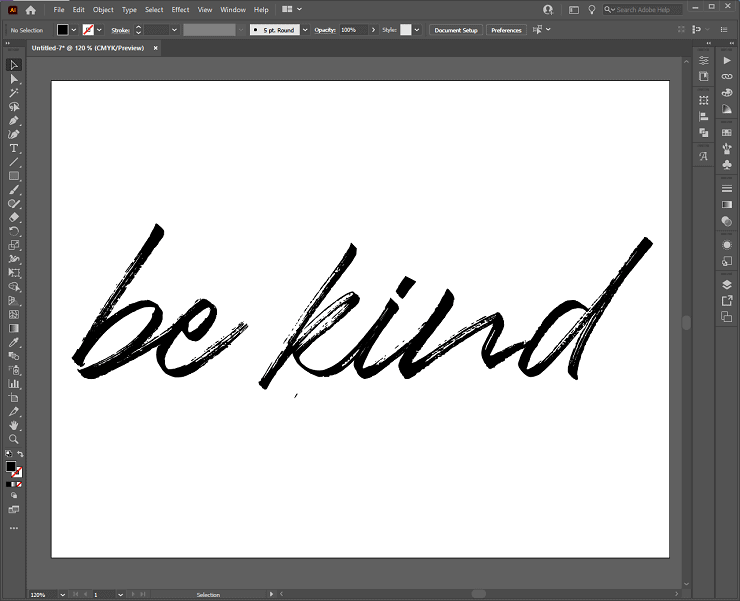
Go back to the Be Kind design on your Adobe Illustrator artboard. Right-click on the text and select Release Compound Path.
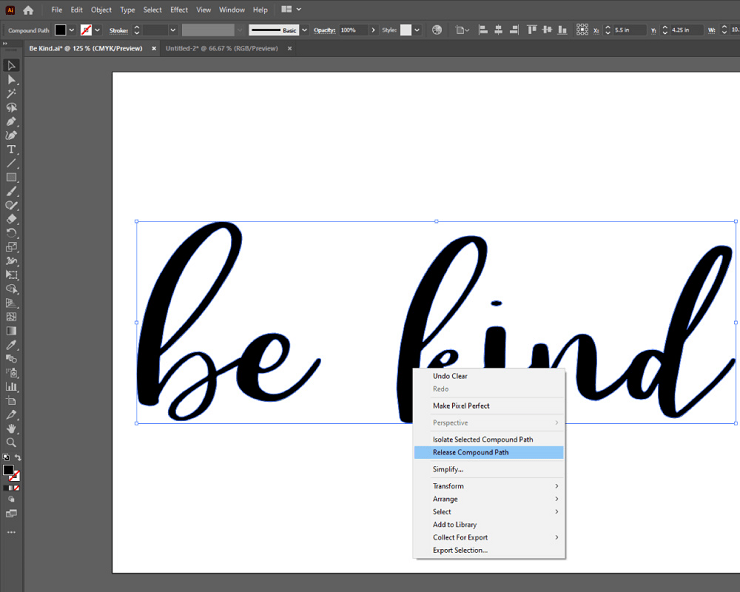
Use your cursor to drag and draw a box around the word Be. Go to Object > Compound Path > Make. Now the word Be is a separate compound path.
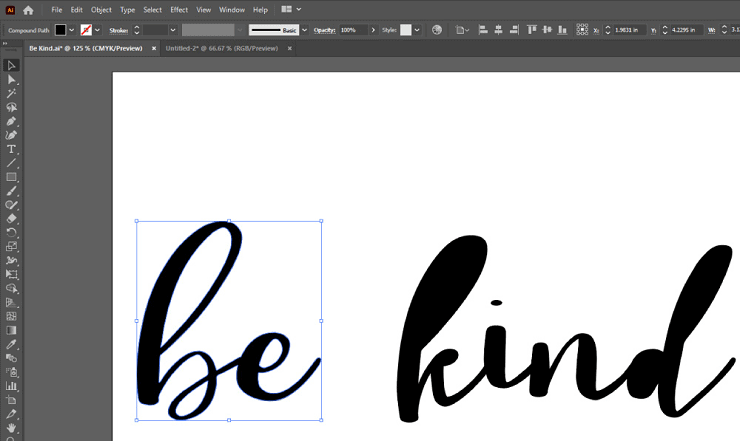
Repeat the same steps for the word Kind.
Now select both words and go to Object > Group.
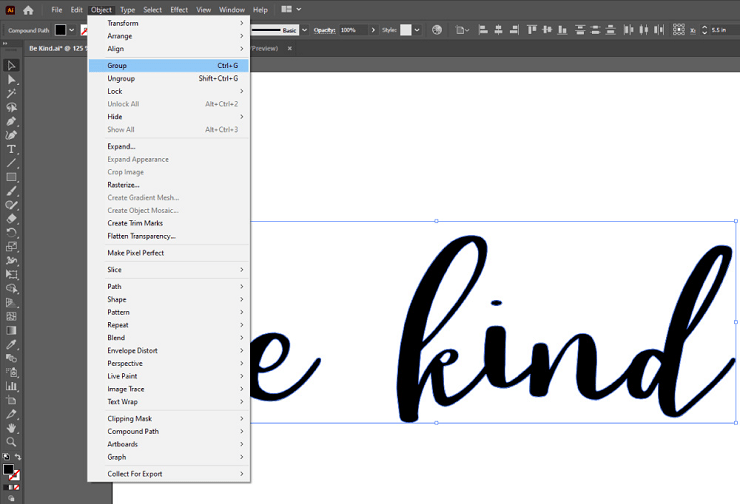
You now have a multi-layer design. Export it as an SVG file.
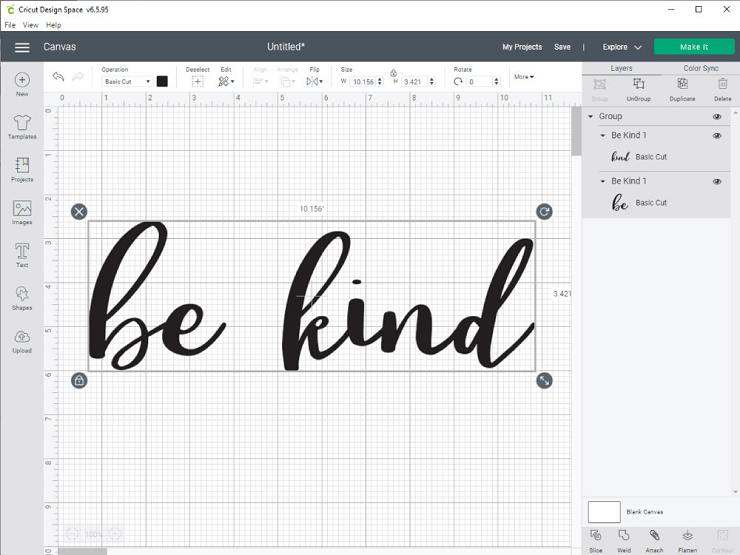
How to check if the SVG file works in Cricut?
Login to your Cricut Design Space and click on New Project.
Select Upload and click on Upload Image.
In the prompt that comes up next, browse the SVG file you just created and select Upload. I used the two-layer Be Kind design.
The design will now appear in your Recent Uploads section. Select the design and click on Insert Images.
Cricut Design Space will now show you the design in two layers. The design should show up the same way it was created in Adobe Illustrator.
If the design looks any different in Design Space from the one you created, there may be an issue with the compound paths created. Rework the file in Adobe Illustrator and check again in Design Space.
Other file formats to provide along with SVG files
Providing DXF and PNG files with SVG files is a good idea.
DXF files work with the Silhouette Studio Basic Edition. PNG files are for anyone looking only to print the design or to print and cut the design.
Go back to your Adobe Illustrator design file. Click on File > Export > Export As…
In the dropdown, to save as a PNG file, select PNG (*.PNG) and Export. Select Resolution > High (300 PPI), Anti-Aliasing > Art Optimized (Supersampling), Background Color: Transparent, and click on OK.
In the dropdown, to save as a DXF file, select Autodesk RealDWG (*.DXF) and Export. Click on OK.
To check if the DXF file works in Silhouette Studio, import the DXF file and check its design outlines. Please note that none of the layering or coloring information from Adobe Illustrator will be visible in Silhouette Studio. But the customer can make compound paths within the Studio software.
Where to sell SVG files?
Here are my top picks for the best places to sell SVG files –
- Etsy
- Your website
- Design Bundles
- Creative Fabrica
- So Fontsy
To begin with, Etsy is the best place to sell SVG files. I started selling on Etsy in 2018, and 35,000 sales later, I believe it's a good platform to sell SVG files.
Use my Etsy Fee Calculator to decide your product pricing and predict how many sales you need to meet your revenue goals.
Pros and Cons of Marketplaces
In addition to Etsy, you can also list your designs on other marketplaces like Creative Fabrica and Design Bundles. The biggest advantage of selling on marketplaces is that they already have huge traffic.
They are perfect for testing different designs and helping you narrow down your niche in the market.
But if I can share anything from my own experience with you, it's that you should simultaneously build your own website.
Marketplaces have huge traffic but are also very competitive. Plus, you cannot establish a direct connection with customers who love your work.
You should also keep in mind that copying is a huge issue in some marketplaces. A copycat can see what your best-sellers are, duplicate or cheaply imitate your designs, and sell them at a lower price.
The best way to move forward is to sell on marketplaces and build your own website simultaneously.
Designing SVG files is only part of the job. Learning how to find and market your designs to customers who like your design style and appreciate your creativity is the most important skill you can develop.
Start your website and attract a loyal following to it by giving away freebies, sharing tutorials, and crafting ideas.
Use your email list to market your designs and to give them special offers on your designs.
You can also sell directly to your blog visitors by setting up a Shopify store or using other platforms like Sellfy, Gumroad, or Kajabi.
How to upload SVG files?
Usually, SVG files and other file formats like DXF and PNG files are zipped into a folder. This way, you don't have to make a separate download for customers using different cutting machines.
The zipped folder is then uploaded to marketplaces or your shop associated with your blog.
How to upload SVG files to Etsy –
- Go to your seller dashboard. Click on “Listings”.
- Select the “Add a listing” button that shows up in the top right corner.
- Fill in the details for your design and upload the display photos.
- When you arrive at the field called “Type”, you will see the option to choose between “Physical” or “Digital”. Select “Digital”
- Fill out the listing description and other details.
- You will see a “Digital Files” section toward the end of uploading the listing. Click on “Upload File” and browse to the zipped folder you created.
Most customers know how to unzip files and use the relevant file supporting their cutting machine.
Occasionally, you may encounter a customer who is new to purchasing and using cut files.
I have a “How-to” guide PDF uploaded to every listing that explains which file works with which machine and how to upload them. You can do this too or have an answer ready to copy-paste every time you receive a message.
Another question you may receive from some customers is that the download does not contain the SVG file. This happens because the customer's device may not show the SVG file with a .svg extension.
The SVG file may show up as a Chrome or HTML document, which will work perfectly well with their cutting machine. Ask your customer to upload the file that looks like a browser file to their cutting machine software.
Can you make money selling SVG files?
Within the first year of selling SVGs, designers can easily make an extra $500 – $3000 per month.
And then, from year two onwards, you can significantly increase your income to make more than $100,000 annually by strategically focusing on designing and marketing.
If you have been wondering about how much money you can make selling SVG files, then yes, earning a full-time income is definitely possible.
Here are some tips that will help you make more sales –
1. Differentiate Yourself
Add your own creative spin to an existing quote to make a design. Find an under-addressed niche within the SVG market. Research is key.
2. Build Your Online Brand
Don't rely only on Etsy or other marketplaces to drive traffic to your store. Start your own blog and give free designs to visitors who sign up for your email list.
You can send weekly or monthly emails to your subscribers with updates about the new designs you have in store with a limited-time discount offer.
You can also add another source of income by setting up a store and selling your designs on your blog.
3. Showcase Your Designs
Show your designs on beautiful mockups to give customers ideas about using them in their crafting projects.
When I started selling SVGs in 2018, I did not use mockups. A few months later, I started using mockups to showcase my designs and immediately saw a huge increase in sales.
Initially, I purchased many different kinds of mockups to show my designs on shirts, mugs, wall art, etc. I used Adobe Photoshop to edit these. Doing this can be time-consuming and expensive.
Later, I discovered Placeit, an online mockup generator, which has been such a lifesaver. I can make beautiful mockups in minutes.
Placeit has a huge library of mockups. They have mockups for every imaginable occasion, and every mockup is easily editable.
How to promote your SVG files?
You can promote your designs on Pinterest since it is the best place to find a huge audience that loves DIY projects.
You can also promote your designs by setting up a Facebook group or joining groups that allow promoting designs.
My personal preference is Pinterest, as I have seen the best results here.
There are two ways to promote your designs on Pinterest –
- Make pins that lead directly to your designs on marketplaces
- Give freebies that lead to collecting emails on your blog
Since marketplaces don't allow you to use customer emails for promoting your designs, building an email list is extremely important.
It is much easier to sell to an engaged audience aware of your work and brand.
Giving weekly or monthly free designs by starting your own website is the most effective way to collect email IDs. It is also the best way to get massive traffic through Pinterest.
I have been able to get millions of views on my Pinterest and get thousands of visitors every month to my blog through this method.
How to license SVG files?
You get to set your license terms when selling SVG files on Etsy. Mention how many units they can make from a single purchase in each listing and your shop FAQs.
You can specify if print-on-demand usage is allowed or not. Also, mention which items are allowed and which aren't. For example, you may not allow making transfers using a design unless they purchase a special additional license.
On other marketplaces, the license terms are the same for all the designers and are set by the platform. Make sure to check their licenses page.
Please note that most marketplaces allow the usage of your designs on print-on-demand platforms like Zazzle, Amazon Merch, Teespring, etc., provided that significant changes are made to your design.
Extra Tips about Selling SVG Files
Watermark Your Designs
Tracing is a rampant problem in the SVG market, and I learned it the hard way. Make sure to watermark your designs and mockups that contain your designs before uploading them.
You can easily watermark your mockups and designs using Placeit.
Check for Trademarks and Copyright
All the Disney and NFL stuff on Etsy violate Trademarks. Shops that sell these items are always in danger of getting their shops shut down.
Just because a quote, brand slogan, or character is already selling on Etsy does not make it safe to use.
At any point in time, the company that owns the trademark reports the listing to Etsy; it will be counted as a strike against the shop.
Always check the TESS database before making any design. This database is maintained by the United States Patent and Trademark Office, where you can check for Trademarks.
Sell SVG Files in Bundles
Buyers love bundles!
Check any marketplace, and you will see that most of the bestselling SVGs are bundles.
Make individual designs that belong to a common theme, and then bundle them up and list them.
Final thoughts on How to make SVG files TO SELL
I hope this blog post helped you understand the basics of making and selling SVG files. Here's a summary –
- Use Adobe Illustrator to make SVG files.
- Select cut-friendly fonts to make your designs.
- Do your research and develop your own style.
- Export SVG files using the right settings.
- Test the SVG files in the cutting machine software to make sure they work.
- Create beautiful mockups for your designs using Placeit.
- Create your stores on Etsy and other marketplaces.
- Find a niche in the market that works for you.
- Start your own blog to grow your email list.
I wish you the best on your design journey!